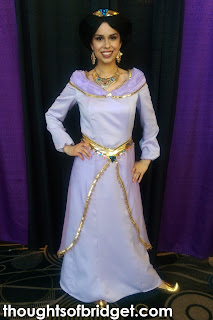
I originally didn't plan on making a tutorial for this dress, but I had a request through Pinterest from Grace, who collects Disney princess dress tutorials for "not-so-grownups" (which can be found here: http://happilygrim.blogspot.com/2013/08/disney-tutorials-for-not-so-grownups.html). Of course I can relate! It has taken me FOREVER to make this tutorial, but here it is!
I actually originally made this dress over 10 years ago when I was a junior in high school. I decided to revamp it for Salt Lake Comic Con FanX 2015. The base dress was pretty much the same, but all the details were pretty much re-done.
1. Base Dress
The base dress was made using the Butterick 3552 renaissance dress pattern. I already had it from an Elven princess dress I made the year before.I removed the extra "bell" section from the bottom of the sleeves, but still kept the whole sleeve a little baggy. I also removed the train from the back of the dress pattern.
 |
| The finished "base dress" |
2. Skirt Overlay
Unfortunately, I don't have many pictures of this process. I don't own a dress form, but luckily have an awesome friend who let me borrow hers (Thanks Kaitlyn!!!). I can't emphasize how helpful this was! Basically, I got the sheer overlay fabric and draped it over the dress while it was on the dress form. I pinned it into place when it looked right. Then I marked where I wanted to cut, and voila! I added the sequin trim and beading onto the bottom.
Then I pinned and basted the overlay in place and tried on the dress to make sure everything looked and fit right. I stitched everything onto the dress, then created a pattern for the waistband using cotton muslim. Again, I draped the fabric onto the dressform, pinned, and cut.
I made sure to add a slit in the back of the waistband and overlay for the zipper. This made the dress much easier to get into!
3. Shoulder poof/overlay
Is there an official name for this part? I used the same fabric as the skirt overlay. I had a long rectangle--I think it was about 60 in. wide and 14 in. tall. I sewed the sequin trim onto the longest parts (top and bottom), then draped onto the dress using the dressform. This part was a little bit trickier. I pinched the rectangle down the middle (where it sits above the bust) and tied a knot. Then I used a LOT of pins to achieve the look that I wanted. |
| Everything is pinned in place on the neckline and shoulders |
4. Rhinestones
I attached all the rhinestones using Aleene's Jewel-It glue. Most of the rhinestones were purchased from JoAnn Fabric & Craft, but the larger triangle shaped ones were purchased online. Triangle shaped rhinestones are so hard to find! I eventually found these ones as part of a bracelet on aliexpress.com that was a only few dollars. I popped them off the bracelet and used them on the waistband and headband instead. They turned out great.5. Zipper & Sleeves
I finished up by adding a hidden zipper. Unfortunately I didn't completely line up the sequin trim, but it still turned out okay. Getting in and out of the dress is a breeze, so that's nice.And there you have it! I hope this gives you some ideas and things were explained in a way that makes sense. If you have any questions or comments, let me know!


Yay! Thanks so much for creating this! It'll be a huge help to any other Jasmine cosplayers out there. I'll add it to my masterlist right away, and thanks again! =)
ReplyDeleteVery well written !Thanks for sharing it for us..
ReplyDeleteSee More
best Article
click me
See More
Read More
Visit Us
Reach Us
See More
Visit Us
Reach Us
best Article
Click Me
best Article
I admire the valuable information you provide in your articles. I'll mark your blog and see my friends here often.
ReplyDeleteescape games
new escape games
Point and click games
free online escape games
online escape games